IDS Software Suite 4.96.1
|
The HDR mode with knee points is only supported by the models UI-122x/UI-322x/UI-522x, UI-313xCP/UI-513x, and UI-314x/UI-514x. |
Some CMOS sensors provide the option of using a piecewise linear characteristic with knee points. With such a piecewise linear characteristic, the form of a gamma or logarithmic characteristic is roughly approximated. In knee point mode the exposure time is divided into two (or three) sections. After each section, excessively light pixel values are reduced to a limit value and briefly post exposed. This prevents overexposure and increases the dynamics.
|
Note: If you want to use knee point mode you should make the following presets to make optimum use of the mode. On the "Image" tab in the uEye Cockpit, set the gain to the minimum value and disable gain boost. On color models, the RGB gain for all colors should be set to the same gain value. Black level control has no effect with knee point HDR. |
To set up the knee point proceed as follows:
1.In uEye Cockpit, go to Properties and open the "Knee points" tab.
2.Enable knee point mode by selecting "On".
3.Select "1" under Number of knee points.
4.First set the limiting level and then the post exposure phase.

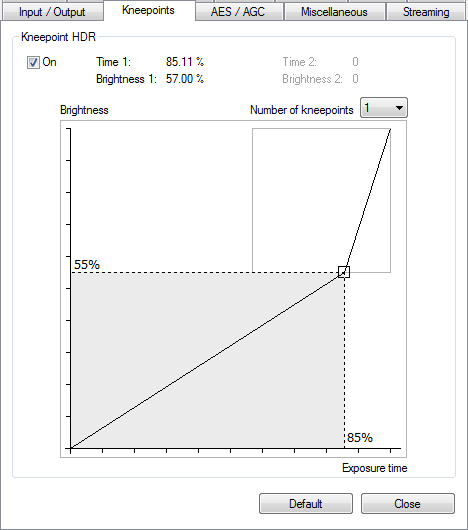
Fig. 49: Setting a kneepoint
Limiting level and post exposure time: The x value of a knee point specifies the first exposure phase as a percentage of the currently set exposure time. The y value specifies the proportion of the maximum pixel intensity in percent. For example, a setting of x = 55, y = 80 would have the following effects: The first exposure phase would last for 55 % of the set exposure time. In this first exposure phase, all pixels are exposed to a maximum of 80 % of the maximum pixel intensity and remain at 80 % until the phase is over. In the second exposure phase, they are exposed again and can reach the full pixel intensity. This means that pixels in bright areas of an image are saturated later, and the image has a higher dynamic range.
Because no split is possible with a minimal exposure time, we recommend using at least 5 times the exposure time. Using two knee points gives you a better graduation and increased dynamics, but with some settings increased image noise can occur.

Fig. 50: Examples of kneepoint HDR
