IDS Software Suite 4.96.1
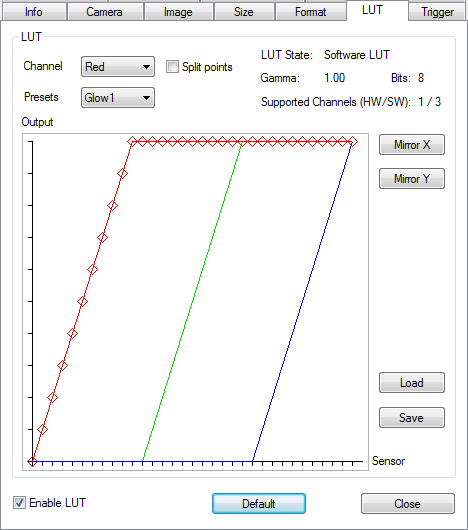
This tab provides settings for the LUT curve of the uEye cameras. If the camera has a hardware LUT function, this function is used. Otherwise the LUT is set on the software side.
Each lookup table (LUT) for the uEye contains modification values for the image brightness and contrast parameters. When a LUT is used, each brightness value in the image will be replaced by a value from the table. LUTs are typically used to enhance the image contrast or the gamma curve.
LUT and automatic exposure (AES)/gain control (AGC)
If you use LUT in combination with automatic exposure (AES) or gain control (AGC) undesired side effects may occur. For example, if you use a negative LUT (the image brightness is inverted) but at the same time the automatic control lightens the image. For this reason, disable the automatic controls if you use a discontinuous (jumps) or not completely positive (gradient) LUT.

Fig. 125: uEye properties - LUT
Hardware LUT
•Channel
In this drop down box, you can choose whether you want to display the LUT for all channels or just for red, green or blue.
•Split points
By default, the LUT has 33 knee points which define 32 individual curve sections. When you select the "Split points" check box, each knee point (except the first and last points) is split into two separate points. Thus, for each curve section the start and end points can be defined independently of the adjacent sections.
•Presets
In this drop down box, you can select and load predefined LUT curves. The following LUT curves are available (depending on the uEye camera model):
Linear |
Linear LUT curve without effect |
Negative |
Predefined LUT, inverts the image |
Digitalgain 2x |
Predefined LUT, digital brightness correction |
Digitalgain 4x |
Predefined LUT, digital brightness correction |
Digitalgain 8x |
Predefined LUT, digital brightness correction |
Glow1 |
Predefined LUT, false-color representation of the image |
Glow2 |
Predefined LUT, false-color representation of the image |
Astro1 |
Predefined LUT, false-color representation of the image |
Rainbow1 |
Predefined LUT, false-color representation of the image |
Map1 |
Predefined LUT, false-color representation of the image |
Cold/Hot |
Predefined LUT, false-color representation of the image |
Sepic |
Predefined LUT, uses sepia toning for coloring the image |
Only red |
Predefined LUT, shows only the red channel of the image |
Only green |
Predefined LUT, shows only the green channel of the image |
Only blue |
Predefined LUT, shows only the blue channel of the image |
•Output
The diagram shows that part of the LUT curve that is selected in the Channel box. You can drag and drop each knee point of the curve. To draw a smooth curve for the selected channel, left-click on a blank space next to the curve.
•Mirror X/Y
These buttons allow mirroring the curve about the X and Y axes.
•Load/Save
Click "Save" to save the current LUT curve to a file. With "Load", you can load a saved LUT curve from a file.
•Enable LUT
Enables/disables the current LUT curve.
Resetting the parameters
Click on the "Default" button to reset all parameters to the model-specific defaults.
See also: •Basics: Characteristics and LUT •Programming: is_LUT() |