IDS Software Suite 4.96.1
|
The multi AOI function is currently supported by the following models: •UI-124x/UI-324x/UI-524x (max. 4 AOIs, 2 per X and Y direction) •UI-125x/UI-325x/UI-525x (max. 4 AOIs, 2 per X and Y direction) •UI-300x (max. 64 AOIs, 8 per X and Y direction) •UI-304x/UI-504x (max. 4 AOIs, 2 per X and Y direction) •UI-306x (max. 16 AOIs, 4 per X and Y direction) •UI-307x (max. 64 AOIs, 8 per X and Y direction) •UI-308x (max. 64 AOIs, 8 per X and Y direction) •UI-309x (max. 64 AOIs, 8 per X and Y direction) •UI-313xLE (max. 4 AOIs, 2 per X and Y direction) •UI-313xCP Rev. 2/UI-513x (max. 8 AOIs, 4 x 2 or 2 x 4 per X and Y direction) •UI-314x/UI-514x (max. 8 AOIs, 4 x 2 or 2 x 4 per X and Y direction) •UI-316x (max. 16 AOIs, 4 per X and Y direction) •UI-318x (max. 16 AOIs, 4 per X and Y direction) •UI-336x/UI-536x (max. 8 AOIs in Y direction) •UI-337x/UI-537x (max. 8 AOIs in Y direction) |
This tab provides settings for configuring the Multi AOI feature provided by specific uEye sensors. The Multi AOI function allows defining more than one AOI in an image and transferring these AOIs all at the same time (see Area of interest (AOI) in the "Basics" chapter).
The sensors of the models UI-306x and UI-308x support multiple AOIs in one image capturing. The AOIs are transferred together as one image. In this mode, you can create up to 4 AOIs in horizontal and vertical direction for UI-306x and up to 8 AOIs for UI-308x.
The sensors of the models UI-313x, UI-314x, UI-316x, and UI-318x support multiple AOIs in one image capturing. The AOIs are transferred together as one image. In this mode, you can define for the cameras:
•UI-313x and UI-314x: up to 8 AOIs (horizontal x vertical: 4 x 2 or 2 x 4)
•UI-316x and UI-318x: up to 16 AOIs (horizontal x vertical: 4 x 4)

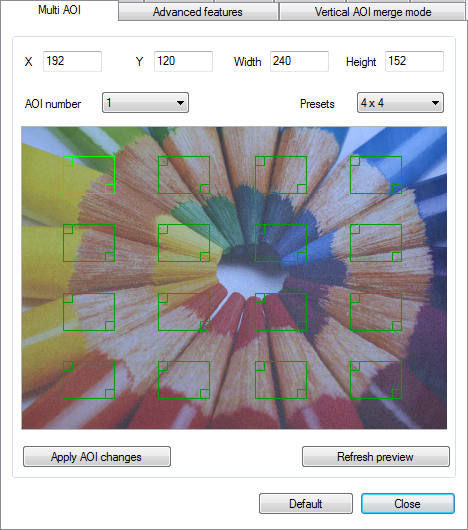
Fig. 135: uEye properties - Multi AOI (UI-306x)
|
Notes on Multi AOI •The available step widths for the position and size of image AOIs depend on the sensor. The values defining the position and size of an AOI have to be integer multiples of the allowed step widths. For detailed information on the AOI grid see the Camera and sensor data chapter. •If the Multi AOI function is enabled, no changes can be made to the image size by subsampling. |
You can edit the single AOIs either in the preview windows or with the input fields to changes their position or size. Note that the AOIs in a line must have the same height as well as the AOIs in a column the same width.
•X/Y
Here, you set the X and Y values of the top left corner of the selected AOI.
•Width/Height
Here, you set the width and height of the selected AOI.
•AOI number
Here, you select the AOI to be edited. Alternatively, you can select the AOI directly in the preview window. The selected AOI is displayed with a brighter color frame in the preview window.
•Presets
Here, you can select various preset multi AOIs from a list.
•Apply AOI changes
After changing the AOIs click on "Apply AOI changes" to activate. If the changes cannot be applied, an information will be displayed. This is the case for example if different heights are set for the AOIs in a line.
•Refresh preview
Refreshes the preview image.
•Preview window
In the preview window, you can set the size and position of the AOIs with the mouse. Move the colored frames as a whole or the upper left or lower right corner. The AOIs are displayed with a red border if the current changes have not yet been adopted.
Resetting the parameters
Click on the "Default" button to reset all parameters to the model-specific defaults.
