IDS Software Suite 4.96.1
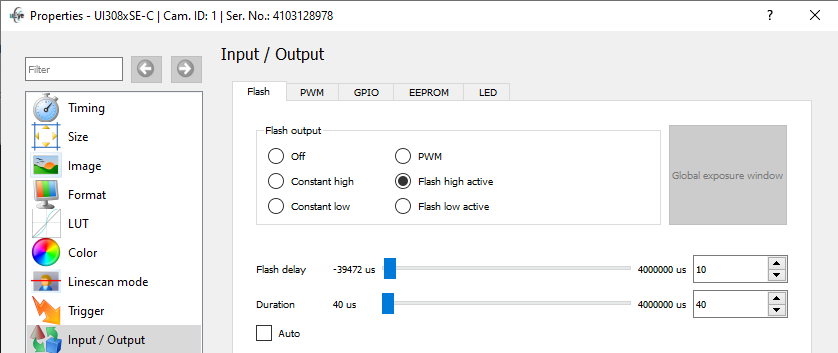
Under “Input/output”, you can set the parameters for the flash output and the GPIOs on your uEye camera (see also Digital inputs/outputs).

Fig. 166: uEye Demo - Input/output
|
When you are using the uEye camera's flash function, you need to re-enable the flash (i.e. disable and then activate it again) whenever you change the pixel clock setting or horizontal image geometry. This is necessary to newly synchronize the internal timing settings of the flash output with the start of sensor exposure. |
"Flash" tab
With the following options, you choose which digital output function you want to activate on the camera:
•Off
The digital output is disabled.
•Constant high
The digital output is set to "High" regardless of the exposure.
•Constant low
The digital output is set to "Low" regardless of the exposure.
•PWM
The digital output is used for pulse-width modulation. The settings you made in the "PWM" tab are used.
•Flash high active
The digital output is set to "High" during the exposure.
•Flash low active
The digital output is set to "Low" during the exposure.
•Global exposure window
The values for flash delay and duration are calculated to trigger the flash when all sensor rows are exposed simultaneously for sensors with rolling shutters. f you are using the "Global start" function, the flash delay has to be set to 0 (see also Shutter methods).
•Flash delay
Sets the delay for the digital output. After an exposure has started, activating the digital output is delayed by the time set in flash delay.
•Duration (0 = Auto)
Sets the switching time of the digital output. The digital output is activated for the time set in "Duration". The value 0 means that the signal is active over the entire exposure time (default).
Requirement in freerun mode: The "Global exposure window" must be enabled.
•Auto
Depending on the set exposure time the exposure windows is calculated automatically. It may take a few images until the flash timing is adjusted.
When you operate the camera in burst trigger mode, you cannot change the flash settings until the burst is complete.
|
Note: The uEye LE USB 3.1 Gen 1 camera family supports flash only in triggered mode and not in freerun mode. |
"PWM" tab - pulse width modulation (GigE and USB 3 uEye cameras)
The pulse-width modulation (PWM) can be controlled by 2 parameters (frequency and duty cycle) and can be set on the flash output and the additional GPIOs respectively (see also is_IO()).
•Frequency (in Hz)
Frequency of the pulse-width modulation (PWM)
•Duty cycle (in %)
Duty cycle of the pulse-width modulation (PWM width)
"GPIO" tab - general purpose I/O
The GPIOs (General Purpose I/O) of the uEye cameras can be used as inputs or outputs (Using GPIO).
•GPIO 1/GPIO 2
Drop-down list for the GPIO which settings are to be edited.
•Update status
Polls the signal level applied to the GPIO.
•Input
Sets the GPIO as trigger input.
•Flash
Sets the GPIO as flash output. The settings you made in the "Flash" tab are used.
•Output low
Sets the GPIO as output. The output signal is statically set to "low".
•Output high
Sets the GPIO as output. The output signal is statically set to "high".
•PWM
The GPIO is used for pulse-width modulation. The settings you made in the "PWM" tab are used.
•RS232
The GPIO is used for the serial interface.
•Trigger
Uses the GPIO for the trigger signal. The settings you made in the "Trigger" area are used.
|
Detailed information on wiring the uEye camera inputs and outputs is provided in the "Electrical Specifications" section of the Specifications chapter. |
"EEPROM" tab
Each uEye camera has a rewritable user memory that can be written with freely selectable characters. This memory can be written either here or via the IDS Camera Manager under Camera information.
"LED" tab
You can toggle the color of the LED on the back of the USB 2 uEye SE camera housing. For the USB 3.1 and USB 3 uEye cameras, you can set the LED flashing (see is_IO()).
Resetting the parameters
Click on the "Reset" button to reset all parameters to the model-specific defaults.
